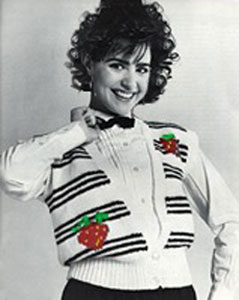
 Fun vest dressing for Spring. Strawberry motifs, applied with duplicate stitch, add a colorful touch to this sporty black and white striped vest.
SIZES
Bust size: 32" 34" 36" 38"
Finished size: 37" 39" 41" 43"
Directions are given for bust size 32. Changes for sizes 34, 36 and 38 are in parentheses.
MATERIALS
- Worsted-weight yarn
- 11 (11, 13, 14) ozs. or 312 (312, 368, 397) g White
- 4 (4, 5, 5) ozs. or 113 (113, 142, 142) g Black
- 10 yards Red
- 3 yards Green
- 1 yard Yellow
- Size 6 needles for ribbing
- Size 8 needles for body or the size needle necessary
to obtain the correct gauge. - 1 stitch holder
- 1 stitch marker
- 1 yarn or tapestry needle
- 2 buttons 3/4" in diameter
GAUGE
Stockinette stitch on #8 needles, 9 stitches = 2" and 13 rows = 2".
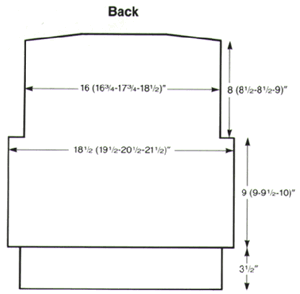 BACK
BACK
Starting at lower edge, with smaller needles and White, cast on 75 (79, 83, 87) stitches.
Ribbing--Row 1: (wrong side) Purl (p) 1 stitch, *knit (k)1, p 1*. Repeat between ** across the row. Row 2: k 1, * p 1, k 1*. Repeat between ** across row. Repeat rows 1 and 2 until 3 1/2" from the beginning and increase 9 stitches evenly spaced across last row and end ready for a right side row. 84(88, 92, 96) stitches. Change to larger needles, Stockinette stitch (St st, knit right side rows, purl wrong side rows) and work Stripe Pattern.
Stripe Pattern: Work 4 rows White, * (2 rows Black, 2 rows White) twice, 2 rows Black and 12 rows White.* Repeat between ** for Stripe Pattern and work even until back measures 12 1/2 (12 1/2, 13, 13 1/2)" from lower edge, end ready for the right side row. Mark last row for underarm by weaving a thread of contrast color through center section of row.
Shape Armholes: Keeping to Stripe Pattern, bind off 6 stitches at beginning of next 2 rows. 72(76, 80, 84) stitches. Work even until armholes measure 8 (8 1/2, 8 1/2, 9)" above underarm marker, end ready for a right side row.
Shape Shoulders: Keeping to Stripe Pattern, bind off 20 (21, 23, 24) stitches at beginning of next 2 rows. Bind off remaining 32 (34, 34, 36) stitches for back neck edge.
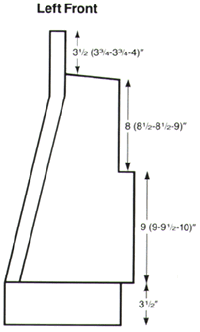 LEFT FRONT
Starting at lower edge, with smaller needles and White, cast on 43 (45, 47, 49) stitches. Ribbing and Front Band: Row 1 (wrong side) k 6, place stitch marker, p 1, *k 1, p 1*. Repeat between ** across row.
Row 2: K1, * p 1, k 1*. Repeat between ** across row to stitch marker, slip marker, k 6. Repeat rows 1 and 2 for 3 1/2," end ready for a wrong side row.
Next Row: (wrong side) K 6 stitches and place these stitches onto a stitch holder, work in ribbing across remaining stitches and increase 5 stitches evenly spaced. 42 (44, 46, 48) stitches. Change to larger needles, St st and Stripe Pattern.
Shape Front Neck: Keeping to Stripe Pattern, decrease 1 stitch at front neck edge on this row, then every 6th row 15 (16, 16, 17) times more. At the same time, when front measures same length as back to underarm, end ready for a right side row. Mark for underarm same as back.
Shape Front Neck: Keeping to Stripe Pattern, decrease 1 stitch at front neck edge on this row, then every 6th row 15 (16, 16, 17) times more. At the same time, when front measures same length as back to underarm, end ready for a right side row. Mark for underarm same as for back.
Shape Armhole: Keeping to Stripe Pattern, bind off 6 stitches at beginning of next row. After front neck shaping is completed, work even on 20 (21, 23, 24) stitches until armhole measures same as for back, end ready for a right side row.
Shape Shoulder: Bind off 20 (21, 23, 24)
Front Band: With right side facing you, slip 6 stitches from holder back to smaller left-hand needle. Join White. Work even in garter stitch (k each row) until front band measures same length as front neck edge. Do not stretch. Continue to work even for 3 1/2 (3 3/4, 3 3/4, 4)" for half of back neck band. Bind off 6 stitches.
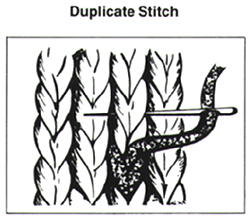 Secure yarn on wrong side of work. Insert the needle from the back and bring yarn through to right side of work in center of a stitch. Slip the needle under the 2 strands of the stitch above as shown and draw yarn through. Now insert needle in center where it came out and draw through to wrong side. Then bring yarn through to right side of work in center of next stitch and complete a Duplicate Stitch as before
RIGHT FRONT:
Starting at lower edge, with smaller needles and White, cast on 43 (45, 47, 49) stitches. Ribbing and Front Band: Row 1 (wrong side) p 1, *k 1, p 1*. Repeat between ** to within last 6 stitches, place stitch marker, k 6 stitches. Row 2: K 6, slip marker, k 1, *p 1, k 1.* Repeat between** across the row. Repeat Row 1 and 2 once more; then row 1 once, end ready for a right side row.
Buttonhole Row: (right side) K 2 stitches, bind off next 2 stitches, k 2 stitches together, slip marker, k 1, *p 1, k 1.* Repeat between ** across row.
Next Rows: P 1, *k 1, p 1.* Repeat between ** across to stitch marker, slip marker, k 1, cast on 3 stitches, k 2 stitches. Beginning with row 2, work again in ribbing and front band until front measures 3" from lower edge, end ready for a right side row. Work one more buttonhole. Beginning with Row 2, work again in ribbing and front band until front measures 3 1/2" from lower edge, end ready for a wrong side row.
Next Row: (wrong side) Work in ribbing across, increasing 5 stitches evenly spaced between side edge and stitch marker, slip last 6 stitches onto stitch holder. Work same as for left front, reversing all shaping.
FINISHING:
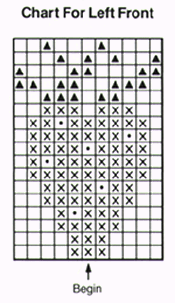
Duplicate Stitch Embroidery: Begin on left front. With right side facing you, measure 6 1/2 (6 3/4, 7, 7 1/4)" down from shoulder and 11 (12, 12, 13) stitches in from armhole edge. Mark next stitch.
Chart: Begin chart for left front where indicated and work to top.
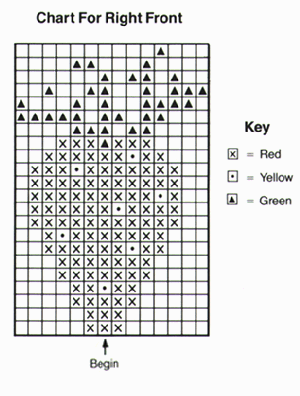
Right Front: With right side facing you, measure 4 3/4 (5, 5 1/4, 5 1/2)" up from lower edge and 20 (21, 22, 23) stitches in from front neck edge. Mark next stitch.
Chart: Begin chart from right front where indicated and work to top. Weave or sew shoulder seams. Sew bound-off edges of left and right front bands together. Sew front and back neck bands to edges, making sure that seam is placed at center back neck edge.
Armbands: With smaller needles and White, cast on 6 stitches. Work even in garter stitch (k each row) for 16 (17, 17, 18)". Bind off 6 stitches. Sew armbands to armhole edges. Weave or sew side seams. Sew on buttons to correspond to buttonholes
Every effort has been made to ensure the accuracy and completeness of these instructions. We cannot be responsible, however, for variances in individual techniques, human errors or typographical mistakes.
©2007 Craft Yarn Council of America
