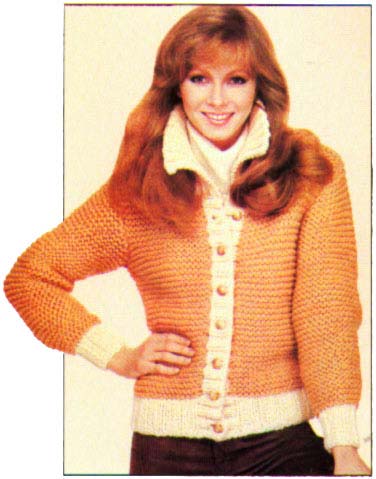
 Knitted with double strands of yarn on large needles, this classic cardigan looks great and keeps you warm. Here's a surprise: the instructions are written in plain English, with no abbreviations. Let us know how you like them!
The instructions are for size 8-10. Changes for size 12-14 are in parentheses.
Materials:
- Worsted-weight yarn
- 21 (24) ounces [595 (680) grams] of Color A
- 8 (10) ounces [227 (284) grams] Color B
- 1 pair size #11 knitting needles or whatever size to obtain the correct gauge
- 1 pair size #9 knitting needles
- 7 buttons
- Yarn needle for joining
Gauge:
- Measuring across 3 stitches = 1 inch
Finished Measurements:
- Bust: 36 (40) inches
- Width of the back before the armhole shaping: 18 (20) inches
- Width of each front before the armhole shaping: 8 (9 1/4) inches
- Width of each sleeve before the cap shaping: 13 (14) inches
Back:
- Use 2 strands of Color B yarn (each from a different skein) as if they were a single strand.
- Using #9 needles and double strand, cast on 54 (58) stitches.
- Purl 2 stitches, knit 2 stitches and purl 2 stitches. Continue to knit 2 and purl 2 across row.
- Next row: knit 2, then purl 2 and knit 2. Continue to purl 2 and knit 2 across row.
- Repeat Step 3.
- Repeat Step 4.
- Repeat Steps 3 and 4 for the ribbing until your piece measures 3 inches from the beginning. Your last row should be Step 3 (4).
For size 12-14 only:
- Increase 1 stitch in the first stitch, knit the next stitch, then purl 2 stitches and knit 2 stitches. Continue to purl 2 and knit 2 until there are 4 stitches left on the other needle, purl 2 stitches, knit 1 stitch, increase 1 stitch in the last stitch. You will now have 60 stitches for size 12-14.
For all sizes:
- Cut Color B yarn about 5 inches from the knitting.
- With a double strand of Color A yarn and #11 needles, knit across row. This row is the right side of the work.
- Knit each row until piece measures 14 inches from the beginning. Your last row should be a wrong-side row.
- Mark for armholes. Tie a short length of yarn through the stitch at each end of the last row.
To shape the armhole:
- Bind off 3 stitches, knit across row.
- Repeat Step 13.
- Knit 1 stitch, slip 1 stitch, knit 1, pass the slipped stitch over the knit stitch, knit until there are 3 stitches left on the other needle, knit 2 together, knit the last stitch.
- Knit across row.
- Repeat Steps 15 and 16, two (three) times more. You will now have 42 (46) stitches.
- Knit each row until piece measures 7 1/2 (8) inches above the armhole marker. Your last row should be a wrong side row.
To shape the shoulder:
- Bind off 6 (7) stitches, then knit across row.
- Repeat Step 19 three times more.
- Bind off the remaining 18 stitches for the back of the neck.
Left front:
- Using Color B (double strands) and #9 needles, cast on 24 (28) stitches.
- Repeat Steps 3 and 4 of the back until your piece measures 3 inches from the beginning. The last row should be Step 3.
- Repeat Steps 9-12 of the back.
- Bind off 3 stitches, knit across row.
- Knit row.
- Knit 1 stitch, slip 1 stitch, pass the slipped stitch over the knit stitch, knit across row.
- Repeat Steps 5 and 6, two (three) times more. You will now have 18 (21) stitches.
- Knit each row until your piece measures 4 1/2 (5) inches above the armhole marker. Your last row should be a right side row.
To shape the neck:
- Bind off 3 stitches, knit across row.
- Knit until there are 3 stitches left on the other needle, knit 2 stitches together.
- Knit row.
- Repeat Steps 10 and 11 two (three) times more. You will now have 12 (14) stitches.
- Knit each row until piece measures the same as the back from the armhole marker to the shoulder. Your last row is the wrong side.
To shape the shoulder:
- Bind off 6 (7) stitches, knit across row.
- Knit row.
- Bind off remaining 6 (7) stitches.
Right front:
- Repeat Steps 1-3 of the left front.
- Repeat Steps 9-12 of the back.
- Knit 1 row.
To shape the armhole:
- Bind off 3 stitches, knit across row.
- Knit 1 stitch, knit 2 stitches together, knit cross row.
- Knit row.
- Repeat Steps 5 and 6 two (three) more times. You will now have 18 (21) stitches.
- Knit each row until piece measures 4 1/2 (5) inches above the armhole marker. Your last row is the wrong side.
To shape the neck:
- Bind off 3 stitches, knit across row.
- Knit row.
- Knit 1 stitch, slip 1 stitch, knit 1 stitch, pass the slipped stitch over the knit stitch, knit across row.
- Repeat Steps 10 and 11 two (three) more times. You will now have 12 (14) stitches.
- Knit each row until piece measures the same as the back from the armhole marker to the shoulder. Your last row should be the right side.
>To shape the shoulder:
- Repeat Steps 15, 16 and 17 of the left front.
Sleeve:
Make 1 piece for each sleeve.
- Using Color B (double strand) and #9 needles, cast on 24 (28) stitches.
- Repeat Steps 3 and 4 of the back until piece measures 3 inches from the beginning. Your last row should be Step 3 of the back.
- Cut Color B yarn about 5 inches from the knitting.
- With Color A and #11 needles, knit 3 stitches, increase 1 stitch in the next stitch, knit 5 (6) stitches, increase 1 stitch in the next stitch, knit 5 (6) stitches, increase 1 stitch in the next stitch, knit 5 (6) stitches, increase 1 stitch in the next stitch, knit 2 (3) stitches. You will now have 28 (32) stitches.
- Knit each row until your piece measures 2 inches above the ribbing.
- Increase 1 stitch in the first stitch, knit to the last stitch, increase 1 stitch in the last stitch.
- Knit each row until your piece measures 2 inches above the last row in which you increased.
- Repeat Steps 6 and 7, three more times. You will now have 36 (40).
- Repeat Step 6 once more. You will now have 38 (42) stitches.
- Knit each row until piece measures 17 (18) inches from the beginning. Your last row should be the wrong side.
To shape the cap:
- Bind off 2 stitches, knit across row.
- Repeat Step 11.
- Knit 1 stitch, slip 1 stitch, knit 1 stitch, pass the slipped stitch over the knit stitch, knit until there are 3 stitches left on the other needle, knit 2 together, knit the last stitch.
- Knit row.
- Repeat Steps 13 and 14, five (six) more times. You will now have 22 (24) stitches.
- Bind off 2 stitches, knit across row.
- Repeat Step 16 three more times.
- Bind off the remaining 14 (16) stitches.
Collar:
- Using Color B (double strand) and #9 needles, cast on 94 (98) stitches.
- Repeat Steps 3 and 4 of the back until the piece measures 5 inches. Your last row should be Step 3.
- Bind off loosely in ribbing.
Left front border:
- From the right side, beginning at the neck edge with #9 needles and Color B (double strand), pick up and knit 70 (74) stitches along the center front edge.
- Work Steps 3 and 4 of the back until 7 rows have been completed.
- Bind off loosely in ribbing.
Right front border:
- From the right side, beginning at the lower edge with #9 needles and Color B (double strand), pick up and knit 70 (74) stitches along the center front edge.
- Work Steps 3 and 4 of the back until 3 rows have been completed.
To work the buttonholes:
- Work 4 (2) stitches in ribbing, then yarn over and work the next 2 stitches together to form a buttonhole, work the next 8 (9) stitches in ribbing. Continue to yarn over and work the next 2 stitches together, then work 8 (9) stitches in ribbing until 6 buttonholes have been made, yarn over, work the next 2 stitches together, work the last 4 stitches in ribbing.
- Work Steps 3 and 4 of the back until 3 more rows have been completed.
- Bind off in ribbing.
Finishing:
- Block as specified on yarn. Sew side seams, shoulder seams and sleeve seams.
- Sew the collar to the neck edge, easing the collar to fit.
- Sew in the sleeves.
- Sew on the buttons.
Every effort has been made to ensure the accuracy and completeness of these instructions. We cannot be responsible, however, for variances in individual techniques, human errors or typographical mistakes.
©2007 Craft Yarn Council of America